Tuesday, August 31, 2010

Thank Goodness for the Big Salad!


It is hard to believe that is is back-to-school time, and still so darn warm on the East Coast!! Hurricane Earl will be taking care of that in just a few days for us, but in the meantime, not only is it too hot to slave over a stove (if you are one of the crazy nuts still cooking your food) but it is too hot to even think about standing around the kitchen, chopping and blending and creating raw food meals!
Thank goodness for hearty salad, perfect for hot summer nights, especially when there's amazing produce in season. Elaine on Seinfeld was onto something with her Big Salad!
One of my favorite big summery salads uses sweet, local corn and local peaches...juicy, sweet and salty all at once, satisfying yet not too filling...and quick and easy to make!
Here it is, in the giant salad bowl my mother-in-law gave us as an engagement gift. We use it every day!
Here's what I throw together in my Big, Fat Local Summer Salad
A huge bowl full of salad greens (soft and juicy red leaf and green leaf work great, as do baby greens)
2 ears of corn, sliced off the cob
2 peaches, cubed
2 handfuls of walnuts, chopped (I like to sprinkle a little salt over them, before I chop, so it gets in the nooks and crannies)
Handful of dried or fresh cherries, chopped (chop with the walnuts & sprinkle of salt if using dried, for an assured salty-sweet contrast)
Combine ingredients in a giant bowl, and dress with:
1 tablespoon apple cider vinegar
2 tablespoons olive oil
Salt & pepper to taste (maybe 1/8-1/4 tsp of salt, and several cracks of fresh pepper)
Teaspoon or so of raw agave nectar, if you are so inclined
A tiny bit of minced shallot or onion, or a dash of onion powder, also optional
Whisk dressing ingredients together in a little bowl, and toss to coat salad.
Raw appetit!

Wednesday, August 18, 2010

Hawaii is for Lovers...and for Lovers of Raw Food!


I'm just back from Hawaii, after a fantastic wedding - complete with a raw entree option and raw wedding cake - and am happy to saw that the 50th state made feasting on living food easy.
Not only were there a slew of little restaurants and natural food stores with raw options, but fresh fruits and veggies were in abundance!
My new husband and I started our trip with a layover in Los Angeles, where we had enough time in the evening for a walk along the beach, and a great meal at Juliano's Planet Raw. We sampled all kinds of things...the jalepeno poppers and coconut curry soup were our favorites, although with a fabulous tasty salad. Of course, we brought a box of chocolate balls back to our hotel for dessert...
In Hawaii, we started out in Kauai, and straight from the airport we went in search of lunch. With the help of the iPod's map/search feature, we were soon on our way to a place with vegan options, figuring it was our best bet...but stumbled upon a raw food restaurant that had opened just a week before! Rainbow Live Food is in the same strip as Java Kai and the Mermaid Cafe in Kapa'a, located in the back of the building. We had delicious live burgers, wraps and falafel on our several trips there...and some fantastic smoothies. While we were eating lunch one day, a supplier brought in a box of avocados the size of dinosaur eggs! We were so grateful to have been drawn to the restaurant, especially since it had just opened.
Breakfasts at our gorgeous hotel consisted of TONS of amazing fruit...melons, citrus fruit, mango, and papaya, and of course sweet, perfectly ripe pineapple.
In Maui, we were staying at a condo, and therefore had our own kitchen to prepare food...woo hoo! On our first night there, we hit a Safeway, which had mangos from Mexico and greens of California...kind of a let down, since we'd really been hoping for some local produce.
We headed to the Whole Foods in Maui, though, and got tons of local kale and lettuce, local tomatoes, mangoes, avocados, etc...and of course, local pineapples. Even though pineapples are said to be "picked ripe" when you buy them on the mainland...the pineapples in Hawaii were so much more golden and sweet...much less acidic...I have to think they are picked a little riper when they don't have to be flown halfway around the world before you eat them. Once the workweek rolled around, there were a lot of farmer's markets to buy produce as well. The mangoes we found at Whole Foods were so incredible...much more interesting, intense, complex flavors than mangoes in the grocery store in the northeast...that we tracked down the farmstand for the orchard they came from, Yee's, and bought almost a dozen! Like everything in Hawaii, the mangoes were not cheap, but they were all ripe and incredibly delicious.
We also came across Joy's Place, a natural foods cafe and deli in Kihei on Maui, and were thrilled to find raw options there as well...in Paia, the Manna Natural Food store had raw entrees and desserts, and plenty of amazing produce, and some raw "junk food" like crackers and cookies as well. I wish we lived closer to this place...it looked smaller from the outside, but it went on forever inside, and had everything you could want.
On the Big Island, we survived with the help of a few picnics we foraged for at the Island Nautrals chain of health food stores. We visited three on the Big Island (there's at least one on Maui as well). They have some raw entrees and dessert options, depending on the location, as well as a big salad bar and snacks, and a juice/smoothie bar.
And of course, the coconuts are literally falling off the trees in Hawaii! Lop the top off, and you'e got the most refreshing drink. We convinced the restaurant to hack into the coconuts above for us, so we could scrape out the meat once we finished the coconut water, and I made a dressing with it one day, and added it to a smoothie the next.
Of course, we did our share of sightseeing, swimming, snorkeling, etc. while we were there...and as great as Hawaii was for our bellies, it was even more beautiful for our eyes. Nature's beauty - and fury, as we witnessed while lava flowed, hissing and steaming, into the ocean only 20 or 30 feet away - was fully apparent in Hawaii, and it reminded us that we are just guests on this incredible planet.
Mahalo!

Thursday, July 15, 2010

What's Up, Doc? Carrot Cumin Crackers


I haven't stopped making delish raw food, I've just been verrrry busy with last minute details for my wedding (yes, I'll be eating raw there, too, with a raw entree and even a raw wedding cake!), and haven't been able to gather my thoughts long enough to blog!
But I have to post this recipe for raw carrot cumin flax crackers for my Aunt Theresa, who asked for the recipe...I might as well share with everyone!
I use a juicer for the carrot pulp, but if you don't have one, just use the food processor...and know that the dehydration time will be longer.

Here's the recipe:
2 cups of flax seeds, soaked in 2 cups of water for 2-3 hours (you really can't skip this step...the soaking makes a goo that sticks the whole thing together)
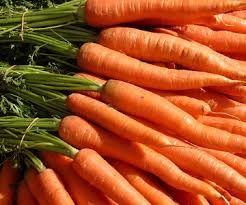
Pulp of 2 pounds of carrots that have been juiced
Cumin, cayenne & salt to taste

Mix carrot pulp and soaked flax seeds together, either in a bowl (more labor intensive, if you are looking to build your biceps) or in the food processor. Add cumin, salt and cayenne to taste...I like cumin, and it goes great with carrots, so I used more than a tablespoon...start with a little less, and see how much you like. A dash or more of cayenne works, depending on how spicy you like it...and at least a teaspoon of sea salt. You could also add garlic, or onion powder, and who knows what else!

Spread on a plastic dehydrator sheet, til you have a thickness of 2-3 flax seeds stacked on each other, and dehydrate for 6 hours or so, until the edges are curling up...flip onto a mesh screen, peel off plastic backing, and dehydrate for 3 or so more hours, until very crisp. These keep well in an airtight container...mine have stayed crispy and yummy for at least a week. Great served with hummus, olive tapenade, or other dips. As I like to saw...raw appetit!

Tuesday, June 15, 2010

Magic! Raw Seven-Layer Bars (Well, Seven-ish)

A friends mentioned she tried raw seven layer bars the other day (and said they were delish!), and so of course I had to invent a recipe for my own version. My mom used to call them Magic Bars, and I think the magic was that they were easy to make, with just a few ingredients, and the end product is greater than the sum of its parts. The raw ones are even easier – no baking! And I just kept using the same mini food processor for each step, without bothering to wash it out in between. Hey, it’s all going to the same place! This version is exceedingly better for you than the original, which uses graham cracker, butter, condensed milk, coconut (ok, I kept that ingredient), and various chocolate chip flavors and nuts. This one only has four layers, but I think in the original people were counting butter, condensed milk, and additional chip flavors as another layer…

Here’s the YUMMY recipe…

“Graham Cracker” Layer

1 cup of walnuts

1 cup of dates, pitted

Pinch of salt, dash of vanilla or some vanilla bean

Blend the above in a food processor until smooth and balled-up…press into a 9 inch pie plate (or other smallish pan).


“Chocolate Chips”

1/3 cup almond butter

½ of the third of a cup of agave nectar (use a few dates and a tablespoon of water if you prefer not to use agave)

¼ cup raw cocoa powder

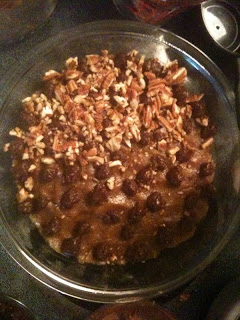
Blend almond butter, agave nectar, cocoa powder in a food processor. Here is a little more magic…somehow these liquidy things get more solid when combined in a food processor. Blend until a doughy ball forms. Roll little balls…about the size of two chocolate chips together, and dot over top of walnut and date layer.

Nuts Layer (No “ ”, because we’re actually using nuts here)

Crush up 1 cup of pecans (or another nut of your choosing) in a food processor, with a pinch of salt, and fill in where the chocolate balls aren’t…here’s a photo of half with nuts, half without.

Coconut Layer

1 cup shredded unsweetened dried coconut

2 tablespoons coconut oil

Pinch of salt

1 tablespoon agave (it is fine to sub in a couple of dates here, as well)

Combine well in a food processor and press over the mixture already in the pie plate. Freeze or refrigerate until it firms up a little (if you can wait that long), and cut into bars to serve. Store in freezer or fridge. You can bring to room temp before cutting and serving if you would like the coconut soft, or serve from the fridge if you like it firm and crumbly...

This is rather sweet, but totally delicious. Raw appétit!

Tuesday, June 8, 2010

Raw on the Road...with the Family Medjools

I'm traveling...again...which is the absolute hardest time to eat raw. Add to that a couple of parties to go to, meals eaten out, and being around family and friends...it is hard! But it is easier as long as I make sure to have a few treats for myself...I've posted the brownie recipe below before, but it is worth repeating because it is really easy to do...and really darn yummy! And a nice break from another plain salad or green smoothie, which are away-from-home staples...little treats spice up what can other wise get tiresome.
I have to say, though, my family is absolutely awesome about supporting my raw food lifestyle...my mom always has plenty of veggies, fruits, and nuts for me, and we even found raw kale chips at a Whole Foods the other day!...and my aunty made a raw zucchini pasta dish for a party over the weekend (creamy pesto sauce tossed with spinach and zucchini noodles...she saw it here in my post of March 10, and it is one of her favorites!).
Of course, you don't HAVE to be traveling to make these brownies...they are nice at home, too! If you don't like chocolate or don't want the little bit of caffeine, just the dates and walnuts are yummy on their own! Topping that with a slice of fresh fruit would be deeelish!

Easy Brownies
1 cup walnuts (pecans are nice, too, and I've also done it with cashews, although they make it a little crumblier)
1 cup pitted dates (try to use nice soft ones like medjools)
2-3 ( or 4 or 5) tablespoons raw cacao powder (or raw carob, if you prefer)
Pinch of sea salt

Process this all in a food processor until you can't tell the dates from the nuts...it seems like this will not be possible, but if you leave it in there long enough, it will. You'll notice the walnuts releasing their oils on the sides of the processor, and it will turn dark and sticky. Touch the sides of the container while it is processing to make sure it doesn't feel hot - you don't want to roast your walnuts! Roll into balls or shape into a brownie-like thing, and either refrigerate or freeze in an airtight container until it is time to nosh! Raw appetit!

Monday, May 31, 2010

Memorial Day Cookout Berry Cobbler!


This fresh raw berry cobbler reminds me of the cakes decorated with blueberries and strawberries that people bring to Memorial Day and Fourth of July parties...I used strawberries and blackberries in mine, but blueberries would be delicious as well!

You could use frozen here, but I think fresh, in season berries are much tastier! For the spring and summer time, I like fresh strawberries as the primary fruit, but use any in season fruit you like…this would be delicious with peaches in the summer, or apples in the fall.

Filling:

2 ½ cups strawberries

¾ cup blackberries

½ cup medjool dates

1) Wash and slice strawberries, and place two cups of strawberries and the blackberries in a large bowl. Squish them gently with a fork, to release some of their juices.

2) In a food processor, combine the additional ½ cup of strawberries with ½ cup of pitted dates. Soft medjool dates are best for this, but if you can’t find nice, soft dates, pit and soak your dates for 10 minutes, then drain them before using in the recipe. Blend berries and dates until smooth

3) Add blended berries to sliced berries, toss well and set aside

Crust:

1 cup almonds

½ cup dates

1 tablespoon coconut oil

½ teaspoon vanilla

½ teaspoon or so of cinnamon, to taste

Pinch of sea salt

1) Combine almonds, pitted dates, coconut oil, vanilla, cinnamon and salt in a food processor until it is almost like a cookie dough, but you can still see small crumbs of almond

2) Press mixture into a pie plate

To Serve:

1) Top crust with berries, and refrigerate before serving or serve immediately.

2) Take several small scoops of the mixture and layer them into an individual serving bowl, so it resembles a cooked cobbler

3) Alternately, you can simply place a few tablespoons of the crust mixture directly into the serving bowl, top with some berries, and continue to layer it, rather than pressing into the pie plate first.


Sunday, May 16, 2010

It's Easy Drinking Greens: No Juicer? No Problem!!


I admit it, I haven’t yet totally acquired a taste for green juice. I don’t hate it, but I don’t love it.However, it is touted by many as a fabulous elixir for health, so I know I should drink it! So I do, sometimes…although not yet being in possession of a juicer (I’m far more partial to drinking my greens in smoothie form), I’ve had to improvise a little and use the blender and a creative straining process. Purists would tell you that blending the juice and then filtering out the solids is not as good a method for getting the most of your juice as, say, actually making it with a juicer, but I think it is still a pretty darn good way to get a lot out of your greens. So if you don't have a juicer, and would like to try green juice, and don't live next door to a juicer bar, give it a shot! Adding an apple or some lemon the first couple of times will help you get used to it...Depending on how juicy your veggies are, this probably makes about 16 oz.

Here’s my recipe, meant to be tweaked:

1 large cucumber (peeled if it is waxed)

1 heart of celery (7-8 stalks)

Couple handfuls of spinach

Sometimes ginger, an apple, some lemon juice or some parsley

1 ½-2 cups of water

First, roughly chop all your veggies, and put them in the blender with 11/2 cups of water if you are using a cuke, 2 cups if not. It looks like this:

Second, blend. Depending on the size of your blender, you may have to blend up some of it first to fit the rest in. Blend until very smooth. Make sure it doesn’t get warm in the blender.

Third, filter through a nut milk bag, or an 8 inch foot section of CLEAN pantyhose. I fit the pantyhose over the mouth of a jar, secured it with a rubber band so that about 2 inches were hanging down, and poured in some of the green mix, like so:


Repeat this process – occasionally undoing the pantyhose, if that is your method, and gently squeezing out juice (yes, it is a little like milking a cow), or squeezing out the nut milk bag, emptying pulp, and adding more mix, until all the mix has been separated…

Finally, enjoy your juice! It has already been diluted, which it should be in any case, but feel free to dilute further with water. Remember to enjoy your juice immediately after making it, and preferably on an empty stomach! It is alkalizing and provides you with a better nutrient punch that any vitamin capsule. Raw appétit!